Unit-IV
Event Handling
1.What is event ? Explain event handling
in java?
Ans:
An object resides in a
particular state until it is made to transit to the other state. This
transition occurs due to an event.
e.g., pressing a key on
the keyboard, moving the mouse, clicking on a button, etc.
The object which generates
the event, is called event generator.
If a button is pressed
for an operation, the button is the event generator.
The
object that is responsible for performing the task when the event occurs is
called the event handler.
There may be more than one event handlers for one single event generated;
2.Explain types of
events in Java?
Ans:
ActionEvent Class
ActionEvent
is an event which indicates that a component-defined action has occurred. This
event is generated by a component (such as a Button) when the
component-specific action occurs (such as a click).
An actionEvent class is defined in Java as
public class ActionEvent
extends AWTEvent
AdjustmentEvent
Class
The
adjustment events are generated by adjustable objects like scroll bar. There
are some adjustment events defined by AdjustmentEvent class, identified by
corresponding integer constants.
AdjustmentEvent
class is defined in Java as,
public class AdjustmentEvent
extends AWTEvent
KeyEvent
Class
KeyEvent
is an event which indicates that a keystroke occurred in a component. This
low-level event is generated by a component object (such as a text field,
Applet, frame) when a key is pressed, released, or typed. There can be three types of key events, which
are identified by integer constants. These are
KEY_PRESSED (it is generated when any key is pressed)
KEY_TYPED (it is generated if a valid unicode character could be generated)
KEY_RELEASED (it is generated when any key is released)
This
class is defined in Java as,
public
class KeyEvent extends InputEvent
MouseEvent
Class
It
is an event which indicates that a mouse action occurred in a component. A
mouse action occurs in a particular component if and only if the mouse cursor
is over the defined part of the component’s bounds when the action happens. MouseEvent
class is defined in Java as,
- void mouseReleased(MouseEvent e) : Mouse key is released
- void mouseClicked(MouseEvent e) : Mouse key is pressed/released
- void mouseExited(MouseEvent e) : Mouse exited the component
- void mouseEntered(MouseEvent e) : Mouse entered the component
- void mousepressed(MouseEvent e) : Mouse key is pressed
public
class MouseEvent extends InputEvent
FocusEvent
Class
This
event is generated when a component gains or loses focus. There are two types
of focus events: permanent and temporary. Permanent focus event occurs when the
user explicitly changes focus from one component to other, e.g., by pressing
the tab key. Temporary focus event occurs when the focus is lost due to
operations like window being deactivated. In this case, when the window will
again be activated, the focus will be on the same component.
FocusEvent
class is defined as,
public
class FocusEvent extends ComponentEvent
ItemEvent
Class
It
is an event which shows whether an item was selected or de-selected. This event
is generated by an ItemSelectable object (such as a list), where the event is
generated when an item of the list is either selected or de-selected.
ItemEvent
class is defined as,
public
class ItemEvent extends AWTEvent
TextEvent
Class
This
event indicates the change in the object’s text. This event is generated by an
object (such as a TextComponent) whenever its text changes
TextEvent
class is defined as,
public
class TextEvent extends AWTEvent
WindowEvent When a window has changed its status.
3.Explain components and containers in java?
Ans:
A graphical user interface is developed with the help
of graphical elements such as buttons, scrollbars, lists, and textfields. These
elements are called components.
These components are generally the source of events that allow the user to
interact with the program .
Component Class
The Component class, which is actually a subclass of
the Object class and superclass of various classes such as Button, Label,
CheckBox, RadioButton, Choice, Canvas, TextComponent, List, and ScrollBar.
Creating
The Components
In order to have a particular component in a window,
you must add that particular component to the window.Container class has a
method, add(), for the purpose.
Component
add(Component ComObj)
The object of the Component, which is to be added, is
passed as the argument to the above method.
If you wish to remove a Component from a window, you
can use remove() method for the same.
void remove(Component ComObj)
In the above syntax, the object of the Component which
is to be removed is passed as the argument to the above method.
Components as Event Generator
All the controls, except label, can generate events.
The notifications for the events generated by these controls are received by
the registered listeners. This notification helps the listeners in identifying
the type of control that generated event.
4.Explain Various AWT Components in java?
Ans:
BUTTON
The Button can be created as below,
Button
buttonName = new Button(Str);
buttonname is the name of the button object , str is caption on the button.
Now the button need to be added to the applet, frame
or any other container.
The syntax for it is as follows:
add(buttonname);
The constructors defined by button are
Button() throws HeadlessException This creates
a Button with no label displayed on it.
Button(String str)throws HeadLessException; This creates
a Button, displaying the string ‘str’ on it.
Methods
void setLabel(String str) This is used for
changing the button’s label text
String getLabel() This is used and
getting the label’s text
Methods
of Button Class
void addActionListener(ActionListeneral)
Adds the specified action listener to receive action events from this
button.
void
removeActionListener(ActionListener al)
Removes the specified action listener so that it no
longer receives action events from this button.
AccessibleContext getAccessibleContext() Gets
the AccessibleContext associated with this button.
String
paramString() Returns a string representing the state of this
button.
void
processEvent(AWTEvent awte) Processes events on this button
void addNotify() Creates
the peer of the button.
Example Button Demonstration
/*<applet code = ButtonClass.class width = 400
height = 150></applet>*/
import
java.applet.*;
import java.awt.*;
import
java.awt.event.*;
Button red;
Label hit;
public void init(){
red = new
Button("Red");
hit = new
Label("Hit Red Button to change the screen color");
add(red);
add(hit);
red.addActionListener(this);
}
public void
actionPerformed(ActionEvent ae){
if
(str.equals("Red")) {
setBackground(Color.red);
}
repaint();
}
}
Output
LABEL
Labels consist of a text string for display only and
they never call an action method. The constructors responsible for creating
labels are given in Table

Example uses the second type of constructor mentioned
in Table
Label
labelname = new Label("This label is for demonstration.");
Here, ‘labelname’ is
label’s object, the string ‘This label is for demonstration’ displayed
on it.
A label can be justified LEFT, RIGHT, or CENTERED.
Label labelname = new Label("This label is for
demonstration.", Label.RIGHT);
labelname.setText("This is new text."); Used to can change the text of a label
String labelText = labelname.getText(); Used to get the label’s text
We can change the alignment or get the alignment of a
label with the methods shown as follows:
labelname.setAlignment(Label.CENTER);
or
int
labelAlignment = labelname.getAlignment();
Example An Applet Illustrating a Simple Label
/*<applet
code = "LabelClass.java" width = 350 height =
100></applet>*/
import
java.applet.*;
public class
LabelClass extends Applet
{
public void init()
{
Label
firstLabel = new Label("Welcome To India ");
add(firstLabel);
}
}
Output:

CHECKBOX
Checkboxes are used as on-off or yes-no switches ,if
you click on an unchecked checkbox, it will get checked and if you click on the checked box, it will get
unchecked.
The checkboxes are the objects of Checkbox class,
which support the following constructors:
Checkbox()
Checkbox(String str)
Checkbox(String str, boolean on)
Checkbox(String str, CheckBoxGroup cbg, boolean on)
The following line will create a checkbox with Names
as a label, null as a placeholder for a group argument, and false to indicate
that it is not selected:
Checkbox
names = new Checkbox("Names", null, false);
Once you create the Checkbox, just add it to the
applet (or other container) by entering the following command:
add(names);
where names is the Checkbox name.
Methods belonging to the Checkbox class
String getLabel() Returns string in the form of
Checkbox text.
boolean getState() Returns boolean in the form of
true or false, depending on whether the Checkbox is selected or unselected.
CheckboxGroup getCheckboxGroup() Returns
the associated checkbox’s group.
void
setCheckboxGroup (CheckboxGroup ckbg) Sets
this checkbox’s group to the specifi ed checkbox group.
void
setLabel(String label) We can change the Checkbox label and set it
to the argument,‘label’.
void setState(boolean state) Changes the
checkbox’s state to true (for selected) or false (for unselected).
Example Demonstration of Checkboxes
/*<applet code=CheckboxClass.class width=400
height=100></applet>*/
import java.applet.*;
import java.awt.*;
import java.awt.event.*;
public class CheckboxClass extends Applet implements
ActionListener {
Button submit;
Checkbox name1;
Checkbox name2;
public void init(){
name1 = new Checkbox ("Apple",null,true);
name2 = new Checkbox ("Samsung",null,false);
Font f = new Font ("Arial",Font.ITALIC,14);
submit = new Button("SUBMIT");
add(name1);
add(name2);
add(submit);
submit.addActionListener(this); }
public void actionPerformed(ActionEvent ae)
{
String str = ae.getActionCommand();
repaint();
}
public void paint (Graphics g)
{
//g.setFont(f);
g.setColor(Color.blue);
if (name1.getState())
g.drawString("Apple",50,60);
if (name2.getState())
g.drawString("Samsung",50,80);
}
}
Output:

RADIO BUTTONS
Radio buttons, which are also called checkbox groups,
are a special kind of checkboxes, where within a particular group, only one box
can be selected at a time. The CheckboxGroup class is used to group together a
set of checkboxes .Checkbox groups are objects of type CheckboxGroup class.
There is only one constructor (the default constructor) which creates an empty
group. The following line will create a checkbox group, named fruits:
CheckboxGroup
fruits = new CheckboxGroup();
Once you create the checkbox group, add the individual
checkboxes to that group.
add(new
Checkbox("mango", fruits, false));
add(new
Checkbox("papaya", fruits, false));
add(new
Checkbox("guava", fruits, false));
add(new
Checkbox("apple", fruits, true));
The first argument is the radio button label, the
second argument is the group of which it is a part of, and the third is the
state, true or false, depending on whether the button is selected or not.
Some of these methods are
void setLabel(String str)
String getLabel()
boolean getState()
void setState(boolean b)
CheckboxGroup getCheckboxGroup()
Example Demonstration of Radio Button
/*<applet code = "RadioDemo.class" width
= 300 height = 200></applet>*/
import java.applet.*;
import java.awt.*;
import java.awt.event.*;
public class RadioDemo extends Applet implements
ItemListener{
Checkbox red, green;
CheckboxGroup cbg;
public void init(){
add(new Label("The 2 radio buttons will change
the screen color."));
cbg = new CheckboxGroup();
red = new Checkbox("Red",cbg,false);
green = new Checkbox("Green",cbg,false);
add(new Label("You can select only one radio
button. That is used to change the
screen color."));
add(green);
red.addItemListener(this);
green.addItemListener(this);
}
public void itemStateChanged(ItemEvent ie){
String str = (String) ie.getItem();
if (str.equals("Red")){
}
else {
setBackground(Color.green);
}
repaint();
}}
Output:

5.Explain types of Container class with example?
Ans:
Containers allow us to organize components into
manageable groups which are extremely important in order to create a good user
interface.
A component in the AWT can only be used if it is held
within a container. The AWT provides four container classes: Panel, Window,
Dialog, and Frame.
Panel
Panel is a window that does not contain a title bar or
a menu bar. It is a generic container
for holding components. It does not add any new method; it simply implements
the container.
The definition of the Panel class is as follows:
public
class Panel extends Container implements Accessible
The Panel class is a direct subclass of the Container
class. Components (such as label and button) can be added to the panel object
by using the add() method.
Constructors of Panel Class
Panel()
Creates a new panel using the default layout manager.
Panel(LayoutManager layout)
Creates a new panel with the specified layout.
The following steps are
followed while creating a panel:
Panel panel = new Panel(); // Create the panel
panel.add(someComponent); // Add components to panel by
using add() method
panel.add(someOtherComponent);
Window
This class creates a top-level window. Top-level
window means that it is not contained within any other object. A Window object
is a window with no borders and no menubar . The default layout for a window is
BorderLayout.It has the following signature:
public
class Window extends Container implements Accessible
Frame
It is a top-level window with a border and title. An
instance of the Frame class may have a menu bar, title bar, and borders. If you are not creating an applet, then you
will be most likely creating a Frame window.
The constructors responsible for creating a Frame are
Frame() // simply
creates a Frame window without any title
Frame(String title)
// creates a Frame with the title specified as string in the argument.
Methods
void setSize(int width, int height) It
is used to set the dimensions of the window. The new dimension in the form of
width and height is passed as argument.
void setSize(Dimension size) Sets the size of the frame with dimension specified.
Dimension getSize()
It
is used to make the window visible after its creation. The component is visible
only if the argument passed is true
void setTitle(String title) The title in the frame
window can be used to set to a new title, passed as argument.

Java Swing Components and Containers
A component is an independent visual control and Java Swing Framework contains a large set of these components which provide rich functionalities and allow high level of customization. They all are derived from JComponent class. All these components are lightweight components. This class provides some common functionality like pluggable look and feel, support for accessibility, drag and drop, layout, etc.
A container holds a group of components. It provides a space where a component can be managed and displayed. Containers are of two types:

- Top level Containers
- It inherits Component and Container of AWT.
- It cannot be contained within other containers.
- Heavyweight.
- Example: JFrame, JDialog, JApplet
- Lightweight Containers
- It inherits JComponent class.
- It is a general purpose container.
- It can be used to organize related components together.
- Example: JPanel
Swing JButton
JButton class provides functionality of a button. It is used to create button component. JButton class has three constuctors,
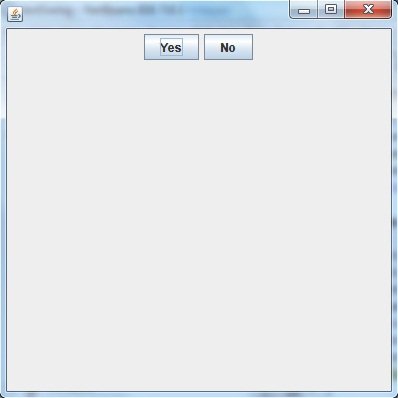
Example of JButton
In this example, we are creating two buttons using Jbutton class and adding them into Jframe container.
JTextField
JTextField is used for taking input of single line of text. It is most widely used text component. It has three constructors,
cols represent the number of columns in text field.
Example using JTextField
In this example, we are creating text field using JtextField class and adding into the jframe container.

JCheckBox
The JcheckBox class is used to create chekbox in swing framework. In this example, we are creating three checkboxes to get user response.
using JCheckBox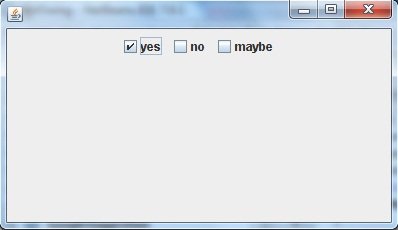
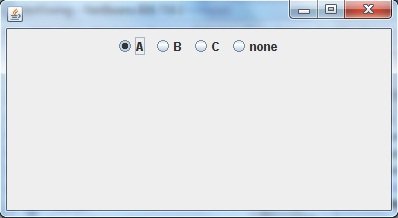
JRadioButton
Radio button is a group of related button in which only one can be selected. JRadioButton class is used to create a radio button in Frames. Following is the constructor for JRadioButton,
Example using JRadioButton
To create radio button in swing, we used jradiobutton class. It is used to get single user response at a time.
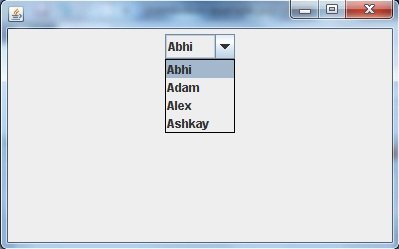
JComboBox
Combo box is a combination of text fields and drop-down list.JComboBox component is used to create a combo box in Swing. Following is the constructor for JComboBox,
Example using JComboBox
Lets create an example to add combobox to the jframe . Combo box is used to create a drop-down menu. See the below example.
A program to change background color of a frame (Using Action Event)
Output:

JLabel
In Java, Swingtoolkit contains a JLabel Class. It is under package javax.swing.JLabel class. It is used for placing text in a box. Only Single line text is allowed and the text can not be changed directly.
Declaration
public class JLabel extends JComponent implements SwingConstants, Accessible
The JLabel Contains 4 constructors. They are as following:
1. JLabel()
2. JLabel(String s)
3. JLabel(Icon i)
4. JLabel(String s, Icon i, int horizontalAlignment)
Example:


JTextArea
In Java, Swing toolkit contains a JTextArea Class. It is under package javax.swing.JTextArea class. It is used for displaying multiple-line text.
Declaration
public class JTextArea extends JTextComponent
The JTextArea Contains 4 constructors. They are as following:
1. JTextArea()
2. JTextArea(String s)
3. JTextArea(int row, int column)
4. JTextArea(String s, int row, int column)
Example:
Lets take an example to create text area in swing. We are using JtextArea class to create text area and adding to Jframe container.


JPasswordField
In Java, Swing toolkit contains a JPasswordField Class. It is under package javax.swing.JPasswordField class. It is specifically used for password and it can be edited.
Declaration
public class JPasswordField extends JTextField
The JPasswordFieldContains 4 constructors. They are as following:
1. JPasswordField()
2. JPasswordField(int columns)
3. JPasswordField(String text)
4. JPasswordField(String text, int columns)
Example:
To generate a password component, swing provides Jpasswordfield that takes user input in encrypted format.


JTable
In Java, Swing toolkit contains a JTable Class. It is under package javax.swing.JTable class. It used to draw a table to display data.
The JTableContains 2 constructors. They are as following:
1. JTable()
2. JTable(Object[][] rows, Object[] columns)
Example:
We are creating an example to create a table using Jtable class and then add it to the Jframe container.


JList
In Java, Swing toolkit contains a JList Class. It is under package javax.swing.JList class. It is used to represent a list of items together. One or more than one item can be selected from the list.
Declaration
public class JList extends JComponent implements Scrollable, Accessible
The JListContains 3 constructors. They are as following:
1. JList()
2. JList(ary[] listData)
3. JList(ListModel<ary> dataModel)
Example:
In this example, we are creating a list of items using Jlist class. this list is used to show the items in a list format and get user input from the list of items. See the below example.


No comments:
Post a Comment